Knowing how to compress files on iPhone not only helps you save a lot of storage space on your device but also makes it easier to store and share. The article below will guide you in detail on how to compress files on iPhone with just a few simple steps.
 |
iPhone users do not need a third-party application to compress files. Because the Files data management application on iPhone has integrated this feature. Below are details on how to compress files on iPhone that you can refer to:
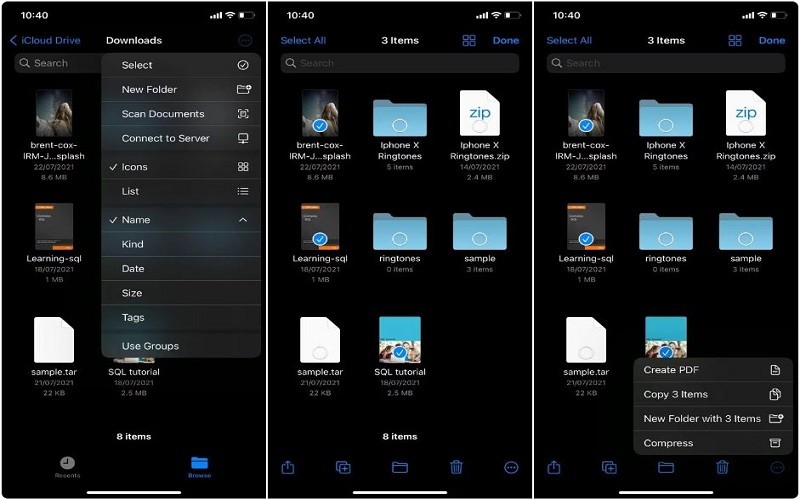
Step 1: First, launch the Files app on your iPhone. Then, tap on the file you want to compress.
Step 2: Next, click on the horizontal three-dot icon located at the top right of the Files application.
Step 3: Here, click on the Select option. Select one or more files to compress depending on your needs.
Step 4: Tap on the three-dot menu located in the lower right corner and tap on the Compress option. The file compression function on the iPhone will be performed automatically.
 |
If you're compressing a single file, the Files app creates a ZIP archive with the same name as the original file's folder. If you choose to compress multiple files at once, a new archive named Archive.zip is created in the same folder as the original files. If you want to rename the archive for easier storage, tap and hold the Archive.zip archive, then select Rename from the pop-up window.
The above article has just guided you how to compress files on iPhone. Wish you success.
Source: https://baoquocte.vn/bat-mi-cach-nen-file-tren-iphone-sieu-don-gian-khong-phai-ai-cung-biet-276456.html


![[Photo] Panorama of the parade celebrating the 50th anniversary of the Liberation of the South and National Reunification](https://vphoto.vietnam.vn/thumb/1200x675/vietnam/resource/IMAGE/2025/4/30/affbd72e439d4362962babbf222ffb8b)


![[Photo] Mass parade to celebrate 50 years of national reunification](https://vphoto.vietnam.vn/thumb/1200x675/vietnam/resource/IMAGE/2025/4/30/825e459ee2f54d85b3a134cdcda46e0d)


Comment (0)