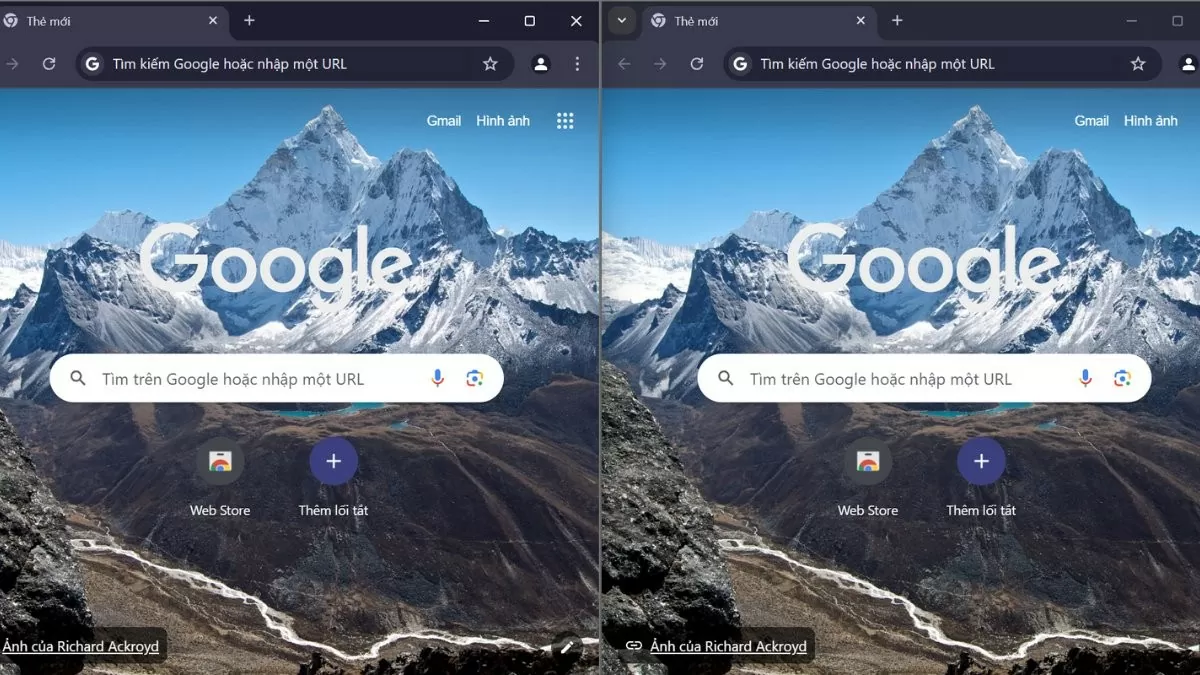
Split screen shortcut on Win 10 helps increase work efficiency, allowing you to monitor multiple applications at the same time. Discover this trick in 3 simple steps!
 |
Instructions to enable split screen mode on Win 10
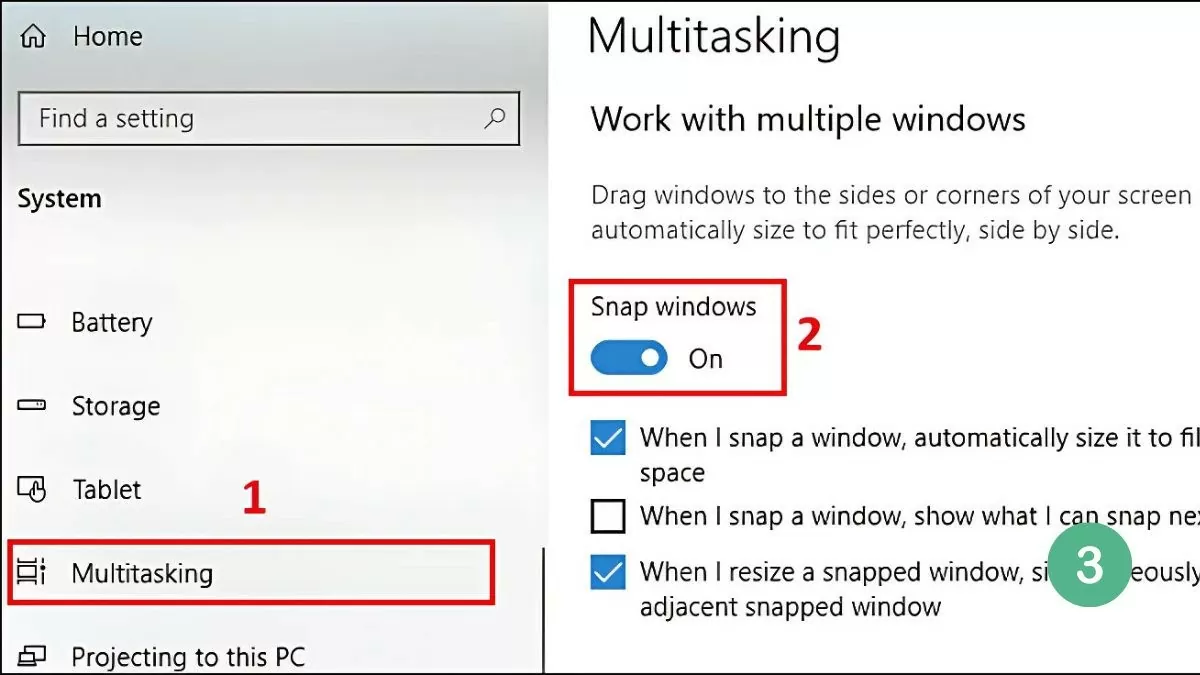
To use the split screen feature, you need to make sure that "Snap Windows" mode is enabled. This is a feature that makes it easy to drag and drop windows to specific locations on the screen. Follow these steps to enable this mode:
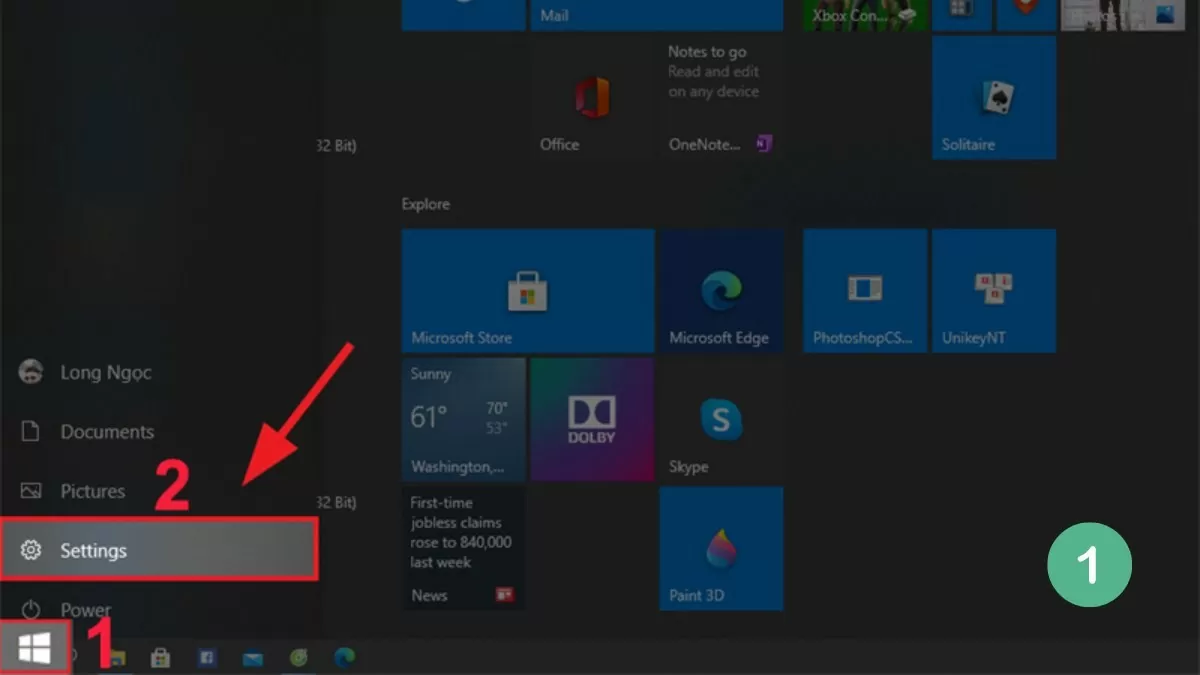
Step 1: First open Settings on Win 10.
 |
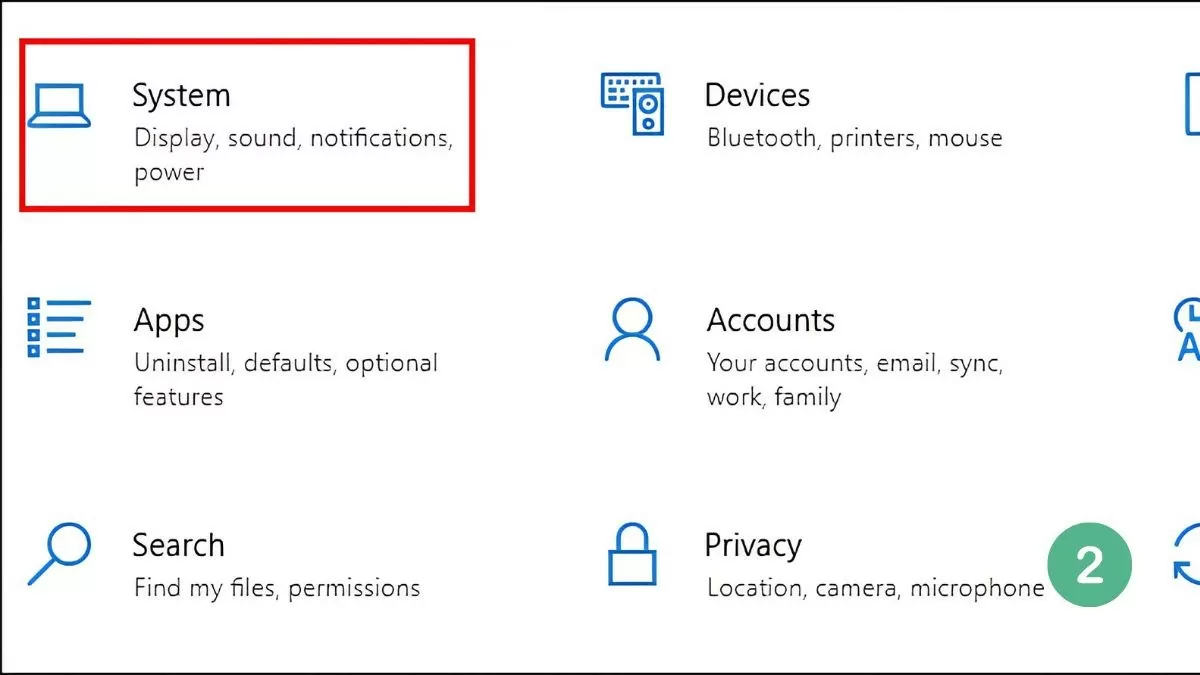
Step 2: Select System, then select Multitasking.
 |
Step 3: Enable Snap Windows mode by enabling this option.
 |
After enabling Snap Windows, you can easily split your Win 10 laptop screen in half using the mouse, Taskbar, or shortcut keys. Detailed methods will be guided in the next section.
The easiest guide to split screen Win 10
Splitting the screen on a Win 10 computer helps you work with multiple windows at the same time, saving time and increasing work efficiency. You can do this easily through methods such as using the mouse, taskbar or shortcut keys.
Use mouse
The easiest way to do this is with your mouse. Just select the window you want to split and drag it to the left or right edge of the screen. When the window touches the edge, you'll see a faint border appear to confirm its placement.
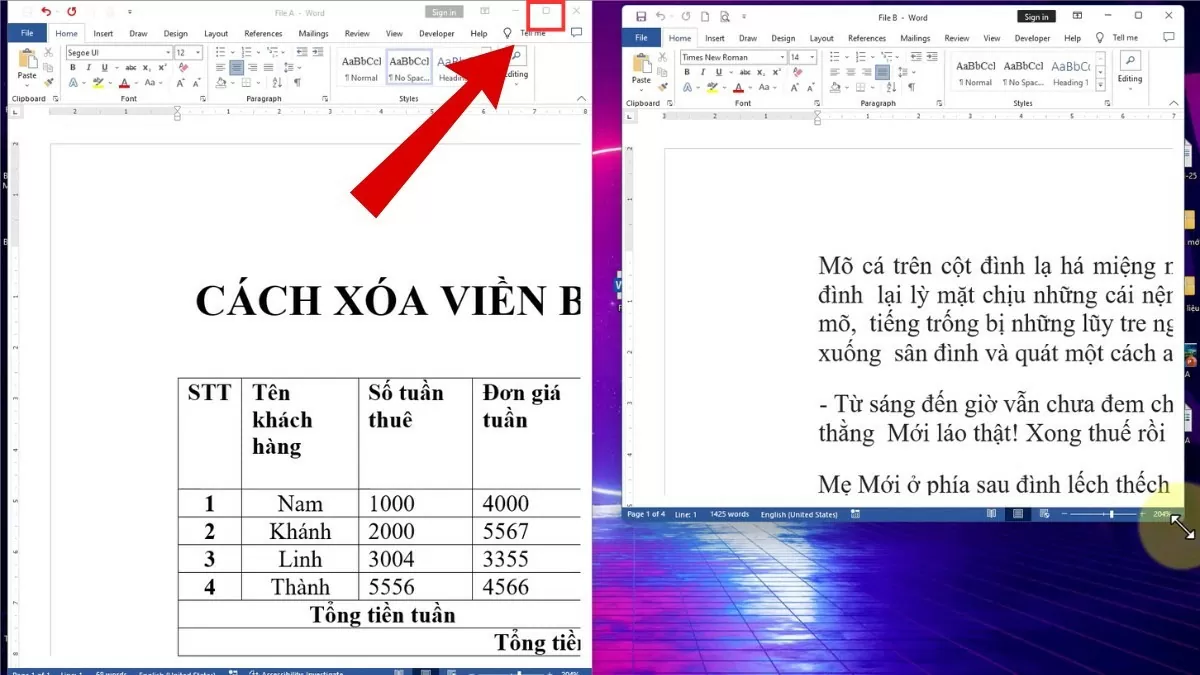 |
When you release the mouse, the window will automatically take up half the screen, while the remaining space shows other windows you have open. You can select a second window to display in the remaining space, making it easy to work with multiple applications at once.
Using the Taskbar
Splitting the screen in Windows 10 is a great way to optimize your workspace, allowing you to work with multiple windows without switching between them.
To use the Taskbar, just follow these simple steps:
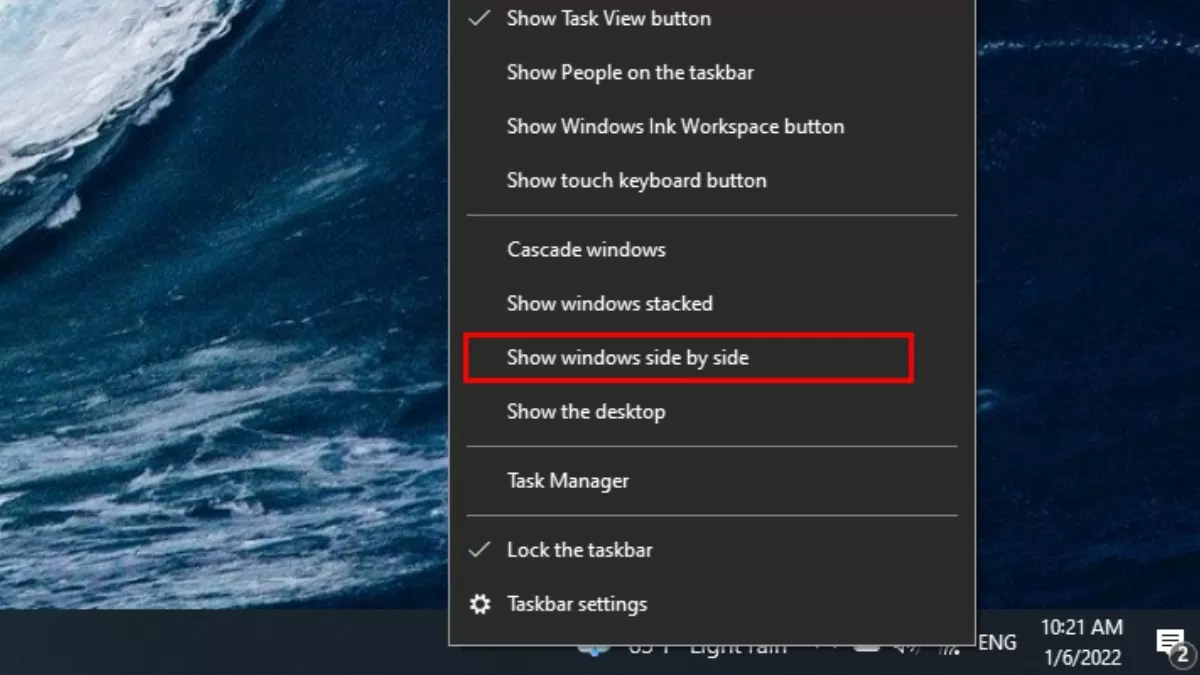
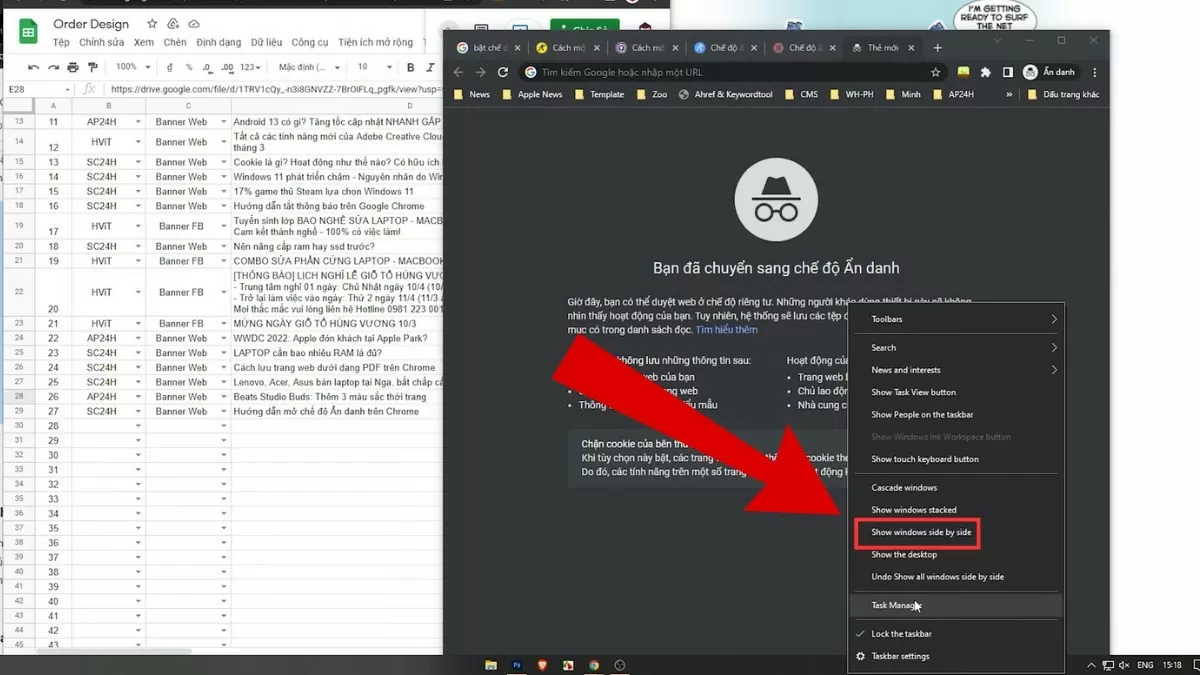
Step 1: Right-click on the Taskbar and select "Show windows side by side" to arrange windows quickly and efficiently.
 |
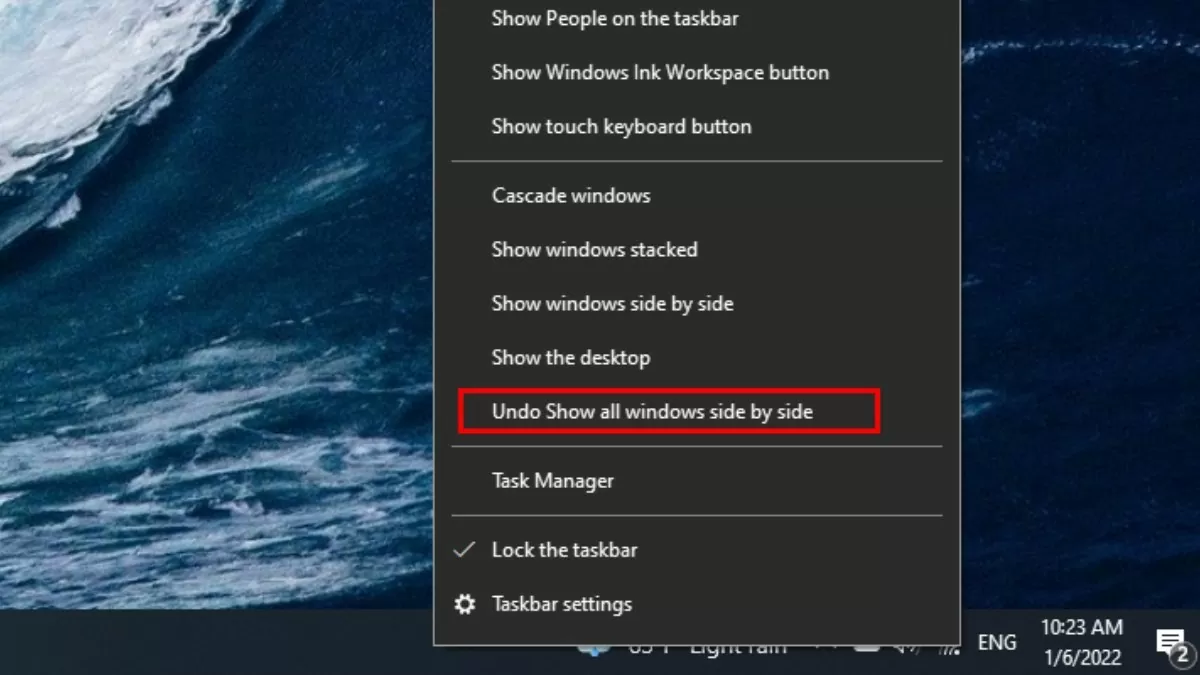
Step 2: To restore the original state, right-click on the Taskbar.
Step 3: Next, select "Undo Show all windows side by side" to cancel the split window arrangement.
 |
All open windows will be automatically arranged and divided evenly on the screen without overlapping, helping users to monitor multiple windows at the same time clearly and neatly.
Use shortcut keys
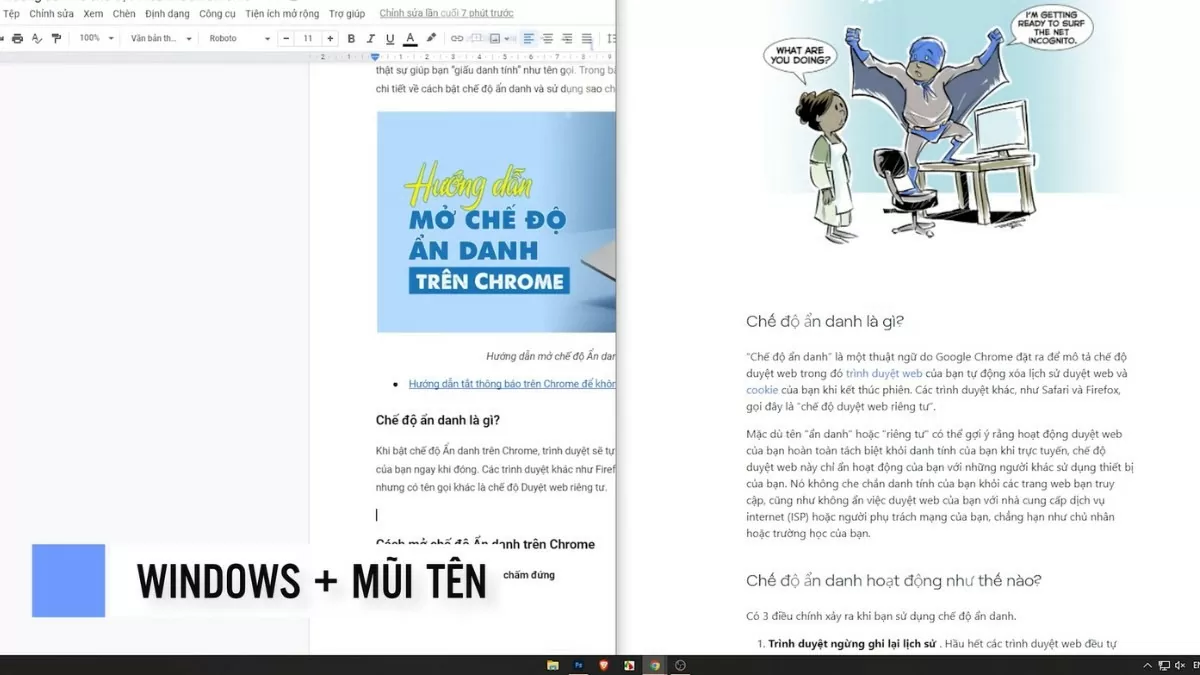
Keyboard shortcuts are a quick and effective way to split the screen on Win 10. You just need to use the key combination Windows + Left Arrow or Windows + Right Arrow to move the window to the left or right of the screen, helping to optimize the working space.
 |
This method not only saves time but also provides flexibility, allowing users to manage multiple windows easily without having to move the mouse too much.
Instructions for splitting the screen into multiple windows
In addition to splitting the screen, Windows 10 also supports splitting the screen into multiple windows at the same time, helping to optimize the workspace and increase multitasking efficiency. Here are the steps to do it:
Step 1: Drag the windows you want to split out of the screen.
Step 2: Then, right-click on the Taskbar.
Step 3: Select Show windows side by side to arrange windows evenly on the screen.
 |
Instructions to enable Snap Windows feature on Windows 11
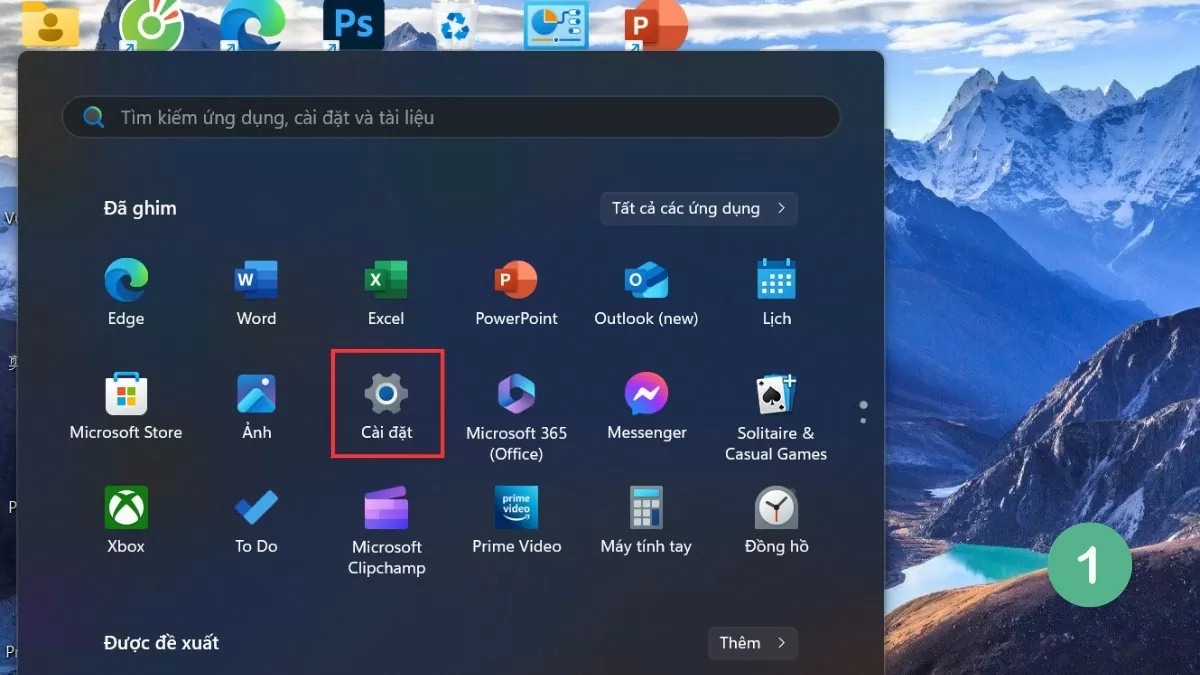
The Snap Windows feature on Windows 11 has been upgraded, bringing easier and more efficient screen splitting capabilities to users. Here are the steps to enable this feature:
Step 1: First of all, open Settings on your device.
 |
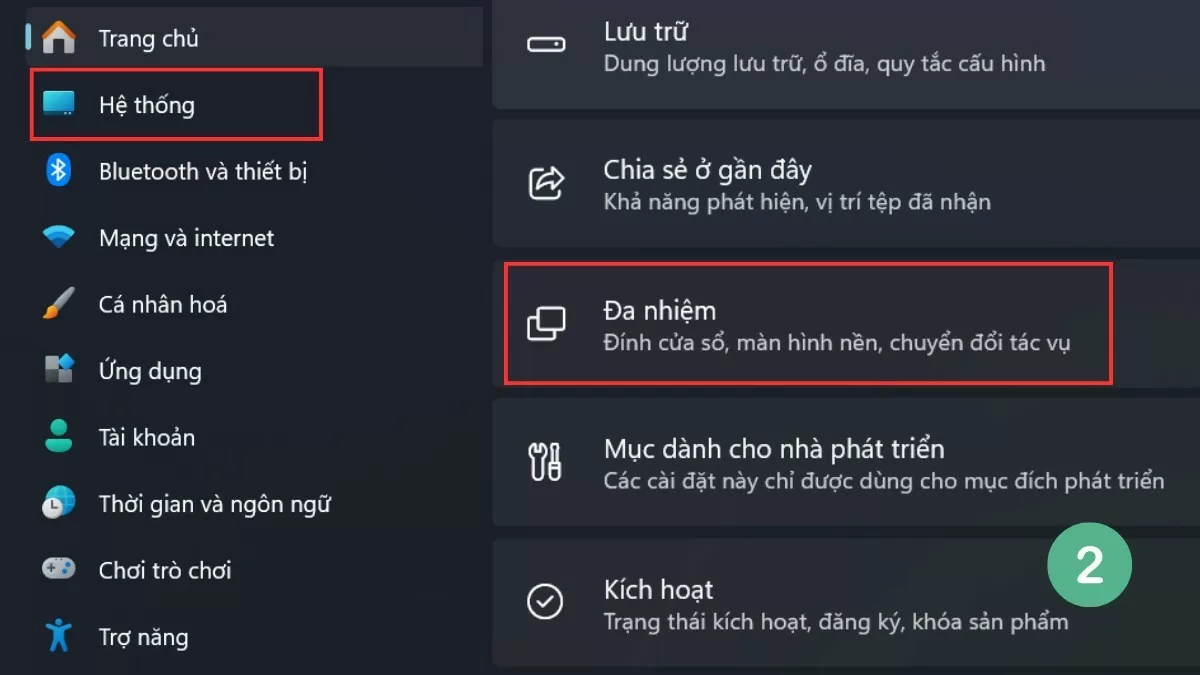
Step 2: Select System and go to Multitasking .
 |
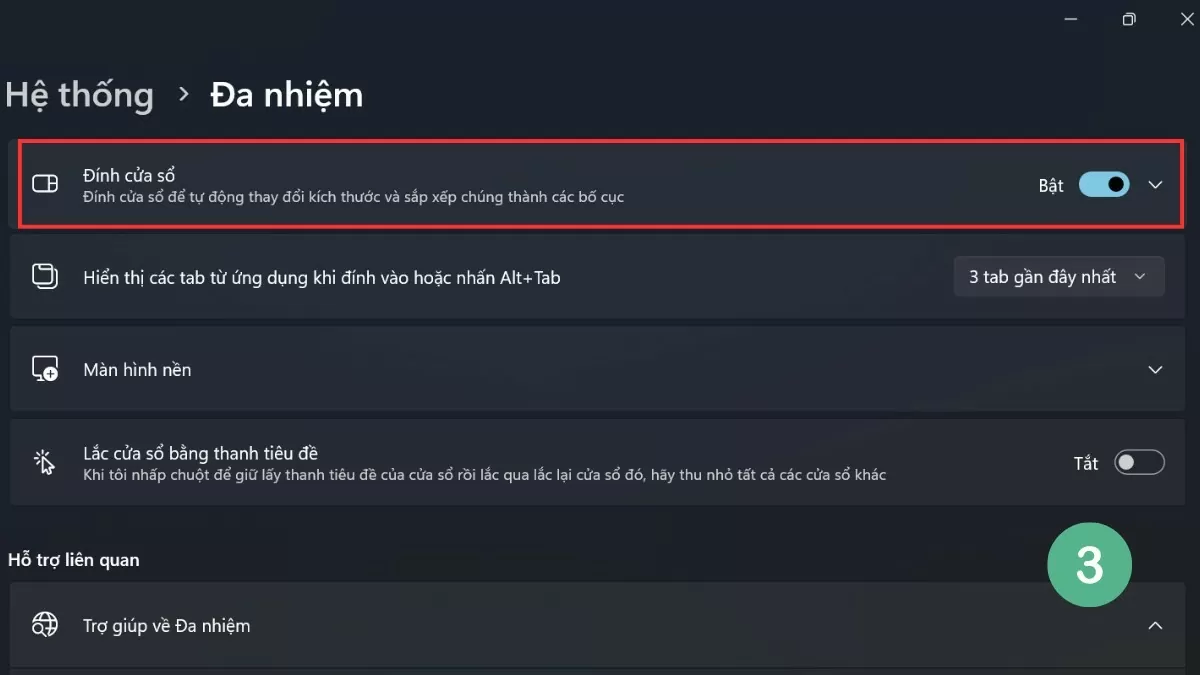
Step 3: Enable the Snap Windows option to enable split screen mode.
 |
The Snap Windows feature on Win 11 also adds many automatic window arrangement options, helping users multitask effectively without having to manually adjust.
Instructions on how to split Win 11 screen effectively
To take advantage of the split screen feature on Win 11, users can choose from many different ways, from using the available tools to quick shortcuts. This version of Windows has improved the ability to split the screen, providing a smooth and convenient experience.
Using Snap Layouts
One of the notable improvements of Win 11 is the Snap Layouts feature, which helps users easily choose window layouts in many different styles, optimizing the workspace.
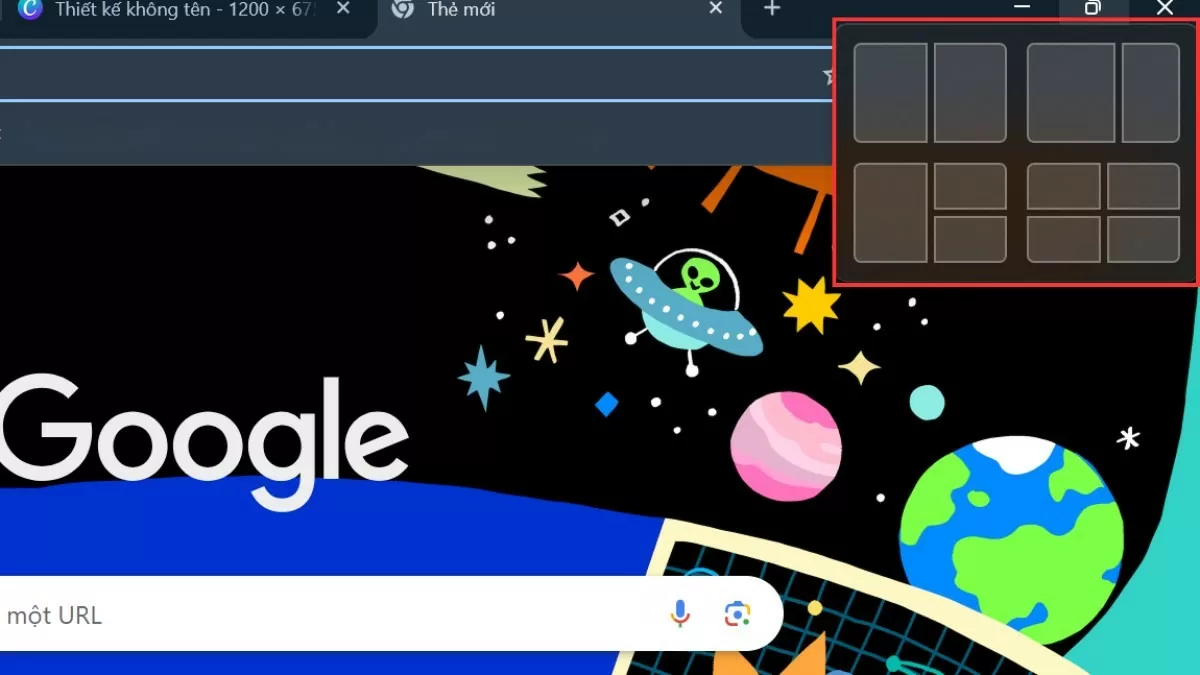 |
To use this feature, simply hover over the window's maximize icon and select the layout you want. The remaining windows will then automatically adjust and arrange themselves according to the selected layout.
Use shortcut keys
Similar to Win 10, Win 11 also supports the split screen feature via shortcut keys, helping users to operate quickly and easily without having to move the mouse much.
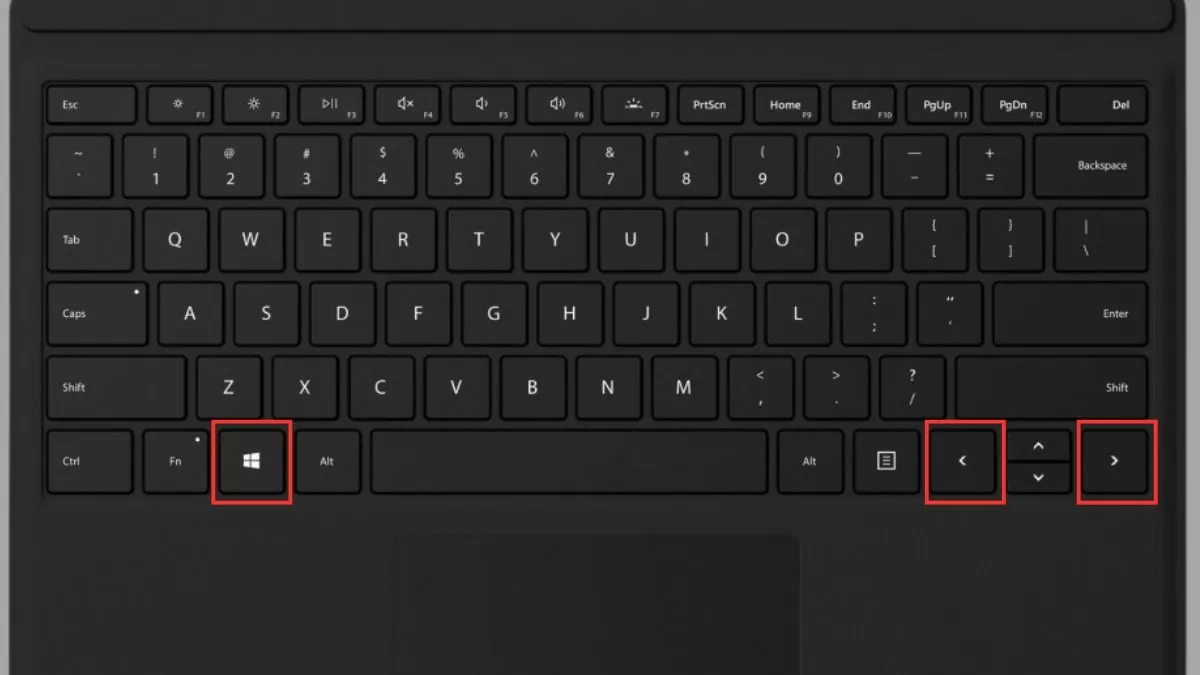 |
By pressing the Windows key + Left or Right arrow, you can quickly move a window to one side of the screen. This not only saves time but also optimizes your workspace, helping you manage multiple windows more efficiently.
Using keyboard shortcuts to split the screen on Win 10 and Win 11 helps you work quickly and create a neat, scientific workspace. With these simple tricks, you can easily improve your work efficiency and computer experience.
Source


![[Photo] Prime Minister Pham Minh Chinh chairs the meeting of the Government Party Committee Standing Committee](https://vstatic.vietnam.vn/vietnam/resource/IMAGE/2025/8/23/8e94aa3d26424d1ab1528c3e4bbacc45)

![[Photo] General Secretary To Lam attends the 80th Anniversary of the Cultural Sector's Traditional Day](https://vstatic.vietnam.vn/vietnam/resource/IMAGE/2025/8/23/7a88e6b58502490aa153adf8f0eec2b2)










Comment (0)